

NetSuite Workflow Instances and History Records
Active workflows can generate a large number of workflow instances and history records. The following records are usually generated when a workflow executes:
- An instance record is generated every time a workflow starts a new execution on a record.
- A history record is generated for every state that the workflow enters and exits for each record on which the workflow executes.
The accumulation of too many workflow instances and history records can negatively impact NetSuite’s performance. For example, you may begin to notice slower-than-usual processing, or unexpected behavior.
The following best practices can help you to manage your workflow instances and history records to avoid possible negative performance.
- When you create new workflows, consider disabling workflow history or setting it to only save records during workflow testing
- Regularly delete workflow instances and history records that you do not need to keep.
Let’s go through the process of managing these “Instances and History records” and how it actually reflects in Netsuite. The following are the different methods to delete workflow instances and history records.
Deleting workflow instances and history records
Note: Deleted workflow instances and history records cannot be recovered.
History records are created each time a workflow moves into a state, including the first state of the workflow. You can delete workflow instances and history records for finished workflow instances and view statistics on the Instances and History Records popup window.

The number of active and finished workflow instances displayed in the Statistics section on the Instances and History Records popup window is an estimate and not an exact total. The number of active and finished workflow instances is rounded down to the closest actual number of instances and records.
The following screenshot displays the “POP UP WINDOW” of instances and records.

Workflow instances and history records are deleted based on the length of time, in months, they have been stored. 3 months is the default setting, but you can specify a different length of time to base the deletion.
Steps to delete instances and history records are shown below:
- Go to Customization > Workflow > Workflows.
- Click Edit next to the workflow that you want to delete workflow instances and history records.
- From the More menu, select Instances and History Records which is shown above in image 1
- In the Instances and History Records popup window, in the Delete section, enter the number of months for the age of the workflow instances and related history records that you want to delete. To delete all of the workflow instances and related history records, enter 0 which is shown above in image 2
- Click Delete.
A record of the deletion process is logged on the History tab on the Workflow Definition page. When the deletion process is complete, an email is sent to the user who initiated the deletion process.
Note: It can take days to delete a large number of history records. Only one deletion process is run at a time. If you initiate multiple deletion processes, they are queued in the order that they were initiated.
Disabling History for a Workflow
NetSuite provides users with the option to disable the history of a workflow when it is executed. In the Keep Instance and History dropdown list, you can select to save workflow instances and history records Always, Never, or Only When Testing.
The following screenshot shows the dropdown list field in a workflow definition page.

Never & Only When Testing – When you select the Never or Only When Testing options, you can view workflow instance and history records on the record’s “Active Workflows Subtab” and “Workflow History Subtab” subtabs while the workflow runs. After the workflow completes or is canceled, the history records related to the workflow instance’s execution are deleted from the database.
Always – When you select the Always option, history records related to the workflow instance’s execution are saved in the database.
Note ( EXIT STATE ) – The history records are never deleted for workflows that transition to a state with the Do Not Exit Workflow box enabled.
Steps to disable history for a workflow are shown below:
- Go to Customization > Workflow > Workflows.
- On the Workflows page, click Edit next to a workflow for which you want to disable history.
- In the context panel, on the Summary tab, click the Edit icon
- On the Workflow Definition window, in the Keep Instance and History dropdown list, click Never.
- Click Save.
To cancel a single workflow instance
You can cancel a single workflow instance from the record on which the workflow instance runs. Users with the Administrator role can cancel workflow instances.
Steps to cancel a single workflow instance are shown below:
- Edit or view the record on which the workflow instance runs.
- Click the Workflow subtab. The Active Workflows subtab appears by default.
- Click Cancel next to the workflow instance that you want to cancel which is shown in the screenshot below

- Click Yes in the popup that appears which is shown below

- Optionally, click the Workflow History subtab to see the canceled instance. The Notes column displays the name of the user who canceled the instance.
Mass Cancelling Workflow Instances
You can cancel multiple instances of a specific workflow simultaneously for the same base record type in NetSuite. You can cancel workflow instances for standard NetSuite record types or custom record types. Use this feature to avoid viewing each record individually to cancel a workflow instance on the record. Users with the Administrator role can cancel workflow instances.
To cancel a workflow instance on multiple records simultaneously follow the below steps:
- Go to Lists > Mass Update > Mass Updates.
- On the Mass Updates page, expand Workflow.
- Click Cancel <workflow name> to process the appropriate workflow. The Mass Update page displays.
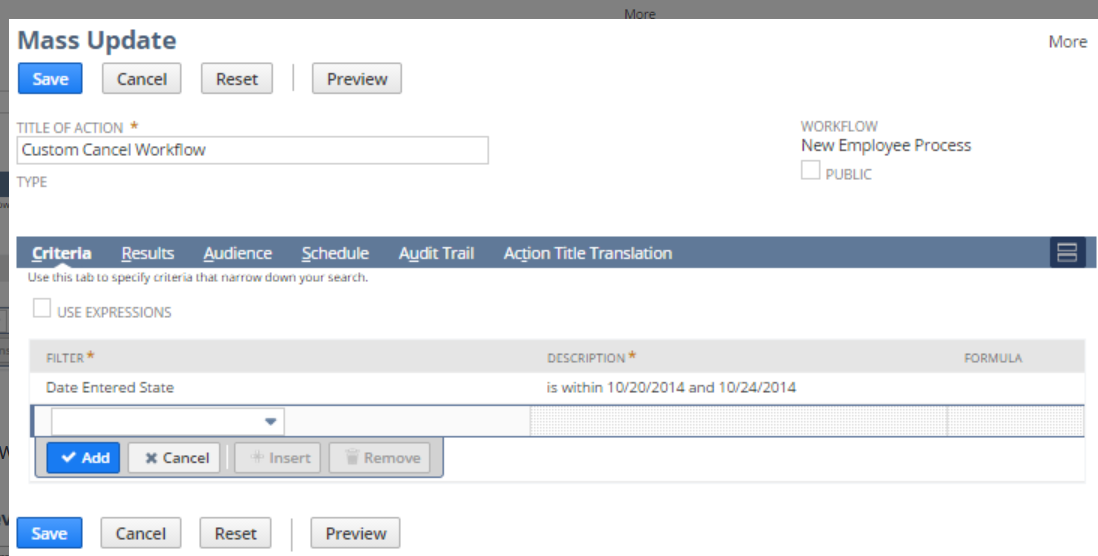
- On the Mass Updates page, enter a Title and define the filters and other options on the following subtabs:
Criteria (Required) – Select a field or formula in the dropdown list and enter values in the popup that appears. These filters are specific to workflow history.
Results (Optional) – Define display options for mass update results. The results appear when you preview the records for the mass update
Audience (Optional) – Define the users who can perform the mass update.
Schedule (Optional) – Define a schedule on which to perform the update.
The following screenshot shows the Mass Updates page for employee records created between two dates:
- Click Preview to view the records with workflow instances to cancel:

- Do one of the following processes:
- To cancel the instances immediately, in the Apply column, select the records with workflow instances you want to cancel and click Perform Update. The status of the mass update is displayed on the Mass Update Status page.
- To save the update and perform it later, click Save. NetSuite saves the mass update and displays the Saved Mass Updates page. Navigate to Lists > Mass Update > Saved Mass Updates. Click Preview next to the name of the update. On the Mass Update Preview page, click Perform Update to cancel the instances.