How To Set Up a Google Mail Connection In Celigo
This blog will discuss in detail how to configure the Google Mail connector in Celigo with a use case/scenario.
Use Case
Celigo can be configured by default to send alerts to a subscribed Celigo user (not external users) when an error occurs in a flow, or when a connection goes offline.

Limitations:
- Alerts cannot be sent to external users
- Customized/formatted notifications cannot be sent either
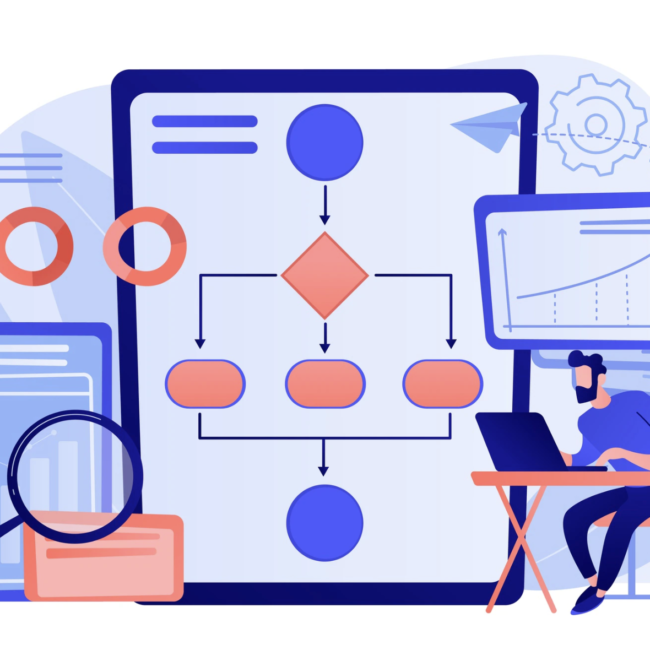
The Google Mail Connector can be used to overcome the above limitations. The following content describes a simple integration which can detect errors while creating a Purchase Order in NetSuite, and then sends the external user a customized email containing said errors.
A. Set up a Google Mail connection
Start by establishing a connection to Google Mail in either of the following ways:
- From the Resources menu, select Connections. Then, click + Create connection at the top right.
– or – - While working in a new or existing integration, you can add an application to a flow simply by clicking Add source or Add destination/lookup.
In the resulting Application list, select Google Mail.

The Create connection pane opens with required and advanced settings.
B. Supply required Google Mail account information
At this point, you will be presented with a series of options for providing Google Mail authentication.

Name (required): Provide a clear and distinguishable name. Throughout integrator.io imports and exports, you will have the option to choose this new connection, and a unique identifier will prove helpful later when selecting among a list of connections that you’ve created.
Application (required, non-editable): A reminder of the app you’re editing.
Configure scopes (required): Scopes are permissions that the Gmail API defines to limit the access to your account. To select the scopes for this connection,
- Click the Configure scopes button.
- To access all of the scopes in the API, click the » button.
– or –
Check the scopes you want to add, and click the > button.

Configure your client id and secret (required): Check this box to reveal iClient options.
iClient (required): Select the iClient pair that stores the client ID and client secret provided to you by Google Mail. To add an iClient and configure your credentials, click the plus (+) button. Click the edit ( 📝 ) button to modify a selected iClient. Be sure to give the iClient a recognizable name for use in any other connections.
Callback URL (read-only): Copy this integrator.io callback URL to provide directions to Google Mail for where to go after authentication. (This URL should be whitelisted with the authorization server.)
How to retrieve the Google Mail iClient pair & specify callback URL
Sign in to your Google API Console (https://console.cloud.google.com/apis/dashboard?project=my-project-64550-mail), and go to Credentials and click Create project in your dashboard.

Describe your project and click Create.

From the console options, select OAuth consent screen at the left. Create a consent screen for internal or external users.

Set the Application type to Public, describe the application, and click Save.
Then, select Credentials from the console options. In the Credentials page, click + Create credentials > OAuth client ID.
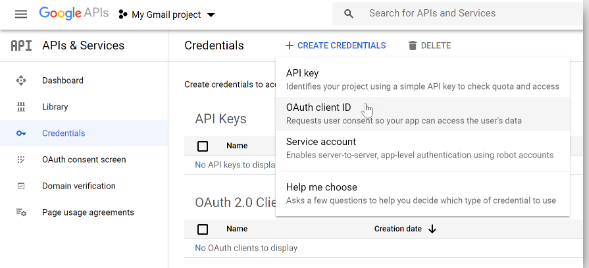
Describe the new client ID. Under its Authorized redirect URIs, paste the Callback URL above. When you click Create, you are shown the client ID and secret for use in the Google Mail connection’s iClient pair.

C. Edit advanced Google Mail settings
Before continuing, you have the opportunity to provide additional configuration information, if needed, for the Google Mail connection.

Borrow concurrency from (optional): Select another connection from the list. By default, all data flowing through a connection record is submitted to the respective endpoint application at the Concurrency level configured for that connection record. There are cases, however, where multiple integrator.io connections need to share the same concurrency level, and this field allows you to specify which connection you would like to borrow from. With borrowed concurrency, the data flowing through both connections will be submitted to the endpoint application together, via a shared concurrency model.
NOTE: Selecting another connection from the drop-down list changes the form. The concurrency level will be hidden, set to the same shared value as the other connection’s.
Concurrency level (optional): Set this field to limit the number of concurrent HTTP requests (up to 25) allowed by the connection resource at any one time, or leave this field blank to use burst mode. With burst mode, integrator.io will make HTTP requests as fast as possible, with high levels of concurrency.
D. Test the connection
Once you have configured the Google Mail connection, you have a couple options for continuing:
- Save & authorize : click this button to test the connection, commit the new connection so that it will be available to all integrations for your account (and applied to the current source or destination app, if you created it within a flow)
- Cancel : click to exit without saving any new changes
When you select Save & authorize, you are presented with a Google Mail form in a new browser window.
After signing in, review the permissions for the integration and click Allow.

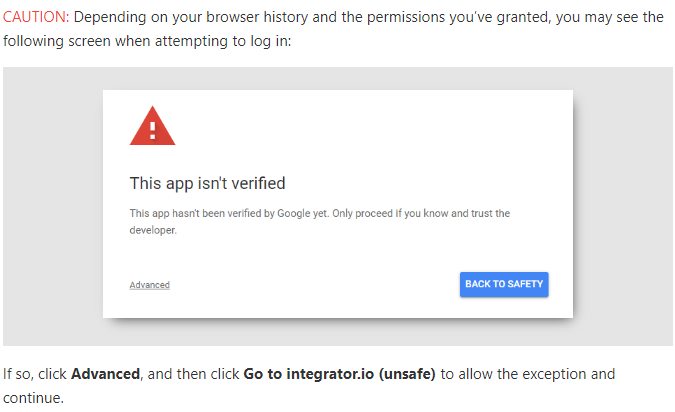
After signing in, review the permissions for the integration and click Allow.

The browser window closes, and the new connection is now successfully added to your account. It will be applied to the current source or destination app, if you created it within a flow. Otherwise, you may proceed to register the connection (click here:https://docs.celigo.com/hc/en-us/articles/360007568091) with an integration.
After creating the connection go to console cloud (Click here: https://console.cloud.google.com/apis/library/gmail.googleapis.com?project=my-project-64550-mail) and enable the Gmail API as shown below.

How to Catch Netsuite returned Errors and Send via Google Mail Connector
1.After exporting source data and mapping it to NetSuite, store response from NetSuite, namely the ID and Error message as shown below

2. If any error is encountered while creating the Purchase Order, the error message is stored in NS.Error Object
The source data that is obtained from the NetSuite response mapping is something similar to the format shown below:
{
//Netsuite create request payload
“NS”: {
“Error”: “Invalid date(time) value: 2019-07-12T05:44:18.000ZT00:00:00.000Z with date(time) format: YYYY-MM-DDTHH:mm:ss.SSSZZ “
}
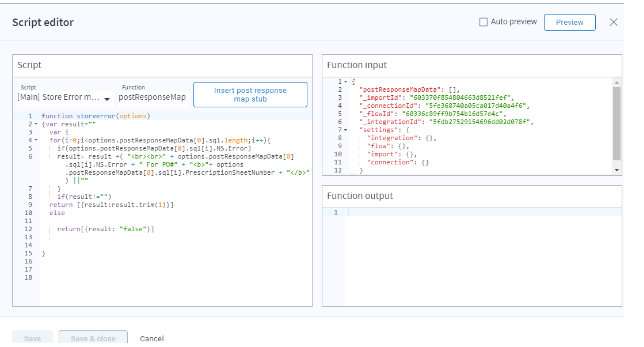
3. A postResponseMap Hook is needed to combine all errors obtained from NetSuite’s response mapping
The Combined Error results are stored inside a result variable as shown below:
{
“result”: “<br><br>Invalid date(time) value: 2019-07-12T05:44:18.000ZT00:00:00.000Z with date(time) format: YYYY-MM-DDTHH:mm:ss.SSSZZ For PO#<b>POUSA0059132</b><br><br>Invalid date(time) value: 2019-10-02T14:36:49.000ZT00:00:00.000Z with date(time) format: YYYY-MM-DDTHH:mm:ss.SSSZZ For PO#<b>POUSA0059357</b>”
}
The Hook will look something similar to the following image (varies depending on requirement/incoming data)
4. If there are no errors, the hook will return a false result payload
{result: “false”}
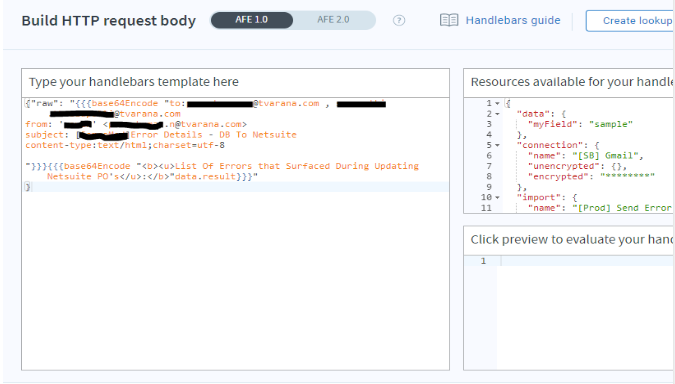
5. Create a new operation
- Choose Form View as “REST API”
- HTTP Method =POST
- Relative URI=v1/users/me/messages/send
- Request Payload Body must be in RFC 4648 standard. (Reference image below)
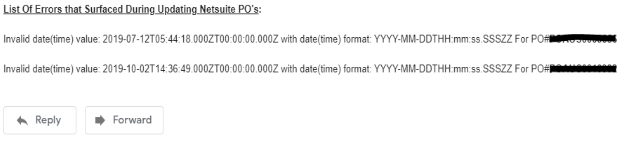
Result/Output:
After running the flow an alert is sent out to provided to address mail
Here’s how it looks
References:
Google API
https://developers.google.com/gmail/api/reference/rest/v1/users.messages/send
RFC 4648