

Creating Commerce Categories
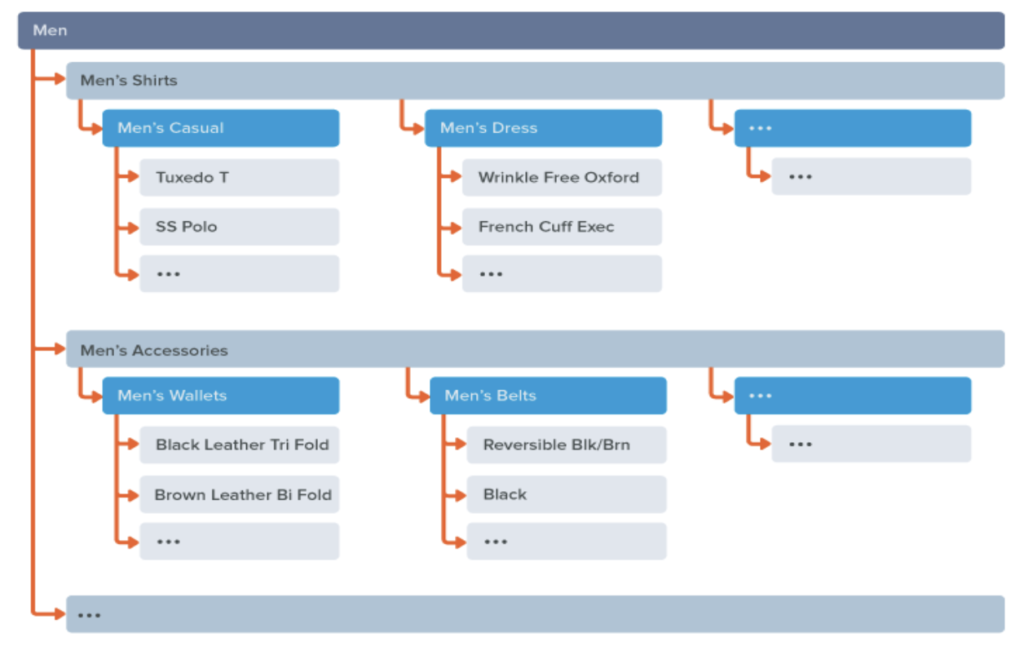
Commerce Categories enable you to create a hierarchical structure of product categories and subcategories.
At the top level of this hierarchy is the catalog. Each site can have one catalog, and all categories are assigned to that catalog. A well-planned and organized catalog lets you present items on your website to your shoppers in a structured fashion. Typically, websites will have a general catalog that presents all items for sale. Alternatively, the catalog can be based on specific occasions such as the current season. For example, you may choose to have a Spring theme that highlights spring-related apparel and accessories, or a back-to-school organization that emphasizes specials for students.
Since you can assign the same item to multiple categories, your category structure can even be a combination of both types and contain subcategories for specific occasions within the general structure. An example of this would be a large multi-purpose category organization with subcategories that highlight spring fashions and accessories in addition to the more common categories of Men’s, Women’s, or Children’s, with each of these containing multiple subcategories.
Category URLs
When creating a category, you will need to specify the URL fragment for that category. The URL fragment is used for accessing that category page. URL fragments for categories and subcategories are concatenated together and prepended with the domain to form the full URL for a category page.
Setup Commerce Catalog
Before you can create commerce categories you must first have a catalog to which you will assign the categories. Each website can have only one catalog.
Steps to Create a Commerce Catalog :
- Go to Commerce > Content Management > Catalog & Categories > Commerce Catalogs > New.
- From the Site dropdown list, select the website for this catalog. Remember, each website can have only one catalog.
- In the Name field, enter a name for this catalog. The name does not appear on the website and is used to identify the catalog in NetSuite.
- In the Description field, enter an expanded description for this catalog. The description is not displayed on the site and is used only to provide additional information for the catalog in NetSuite.
- Click the Save button.
To add a Commerce Category
- Go to Commerce > Content Management > Catalog & Categories > Commerce Categories > New.
- Enter the Name for the category. The name identifies the category in NetSuite and can be used publicly on the site in category navigation.
- Select the catalog for this category. Remember the catalog determines the website for which this category is available. Each website can have only one assigned catalog.
- If you are creating a subcategory, then select the primary parent category to which this subcategory should be assigned. Leave this field empty if you do not want to assign a primary parent category.
- Enter a title for the page. This value will populate the <title> element for an SCA category page.
- The URL Fragment lets you specify the section of the URL that can be used to navigate to the category page.
- The Display in the Web Site box lets you specify if a category should be available to visitors on your site. If the box is not selected, the category is not displayed on an SCA site.
- Assign items to the category.
- Click the Save button to save the category.
Assign Items to a Commerce Category
Items are assigned to categories through the items subtab on the Commerce Categories page. Assigning items to a category makes those items accessible under that category on the website. An item can be assigned to multiple categories.
- Go to Commerce > Content Management > Catalog & Categories > Commerce Categories
- Select the category to display the category record.
- Click the Edit button.
- Click the Items subtab.
- Select the item from the item dropdown list. The list only includes those items configured to display in the web store.
- If this is the item’s primary category, select the Primary Category box. The primary category is used on the item detail page of SCA sites to provide a link for visitors to quickly access the primary category for an item.
- Click the Add button to add the item to the list.
- Repeat steps 5 through 7 for each item you want to assign to the category and click save.
Categories in Site Management Tools
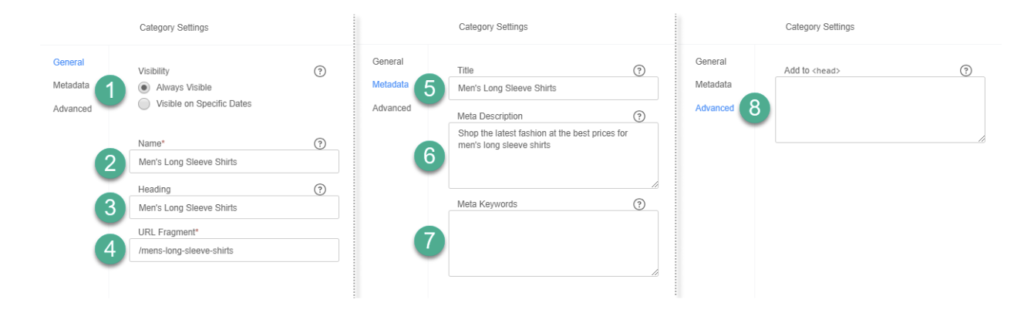
In addition to creating and managing categories in NetSuite, you can also manage categories in Site Management Tools. Any changes you make to categories in SMT are reflected in NetSuite. Any category management you perform in NetSuite is reflected in SMT. A category page lets you set the page attributes, including name, heading, path, title, meta description, addition to <head>, and meta keywords. These settings are displayed in the Category Settings on the side panel. The following screenshot shows each of the three category settings subtabs.
To Add a Category in SMT :
- Log in to SMT.
- Click Overview Mode on the toolbar.
- Click New Category. This displays the category settings in the side panel.
- Enter the following information on the General subtab:
- Visibility preferences.
- Name
- Heading
- URL Fragment
- Click the Metadata subtab and enter the following information:
- Title
- Meta Description
- Meta Keywords
- Click the Advanced tab and enter the HTML code to include in the <head> area of this category page.
- Click Save.
To assign items to a category or subcategory in SMT:
- Log in to SMT.
- Click Overview Mode on the toolbar.
- In the category list, the Items column reports how many items are assigned to the category. Click the icon in this column to add items. This displays the side panel.
- Click Add Items.
- Enter keywords in the search field to search for the items you want to add. The system locates items that match the keywords and lists them below the search field.
- Select the items to assign to this category. To add only one item, click and drag the item from the item search list to the assigned items list. To add multiple items, click each item in the search list that you want to assign to the category. When you click an item a checkmark is displayed to the left of the item image to indicate that it is selected. Drag the selected items from the search list to the assigned items list.
- When you finish adding items, click Save.
Conclusion
Commerce categories are a critical component of managing e-commerce stores. They enable businesses to group similar products or services together, making it easier for customers to find what they are looking for. They also enable businesses to provide a better customer experience, better manage their online store, and create engaging shopping experiences that drive sales.
Interested in learning more about how you can optimize your NetSuite platform? Schedule a consultation with us today!