
Connect To Snowflake Using Celigo and Boomi
Snowflake is fundamentally built to be a complete SQL database. Snowflake enables data storage, processing, and analytic solutions that are faster, easier to use, and far more flexible than traditional offerings. Snowflake works with a wide range of data integration tools, including Celigo and Boomi.
The Snowflake connector allows you to leverage the capabilities of a Snowflake data warehouse which include speed, usability, and flexibility.
This connector is key to the Boomi integration process making it easy to work with Snowflake, one of the fastest growing cloud data management platforms
Prerequisites:
User should be familiar with Snowflake, Celigo applications and Boomi Connectors.
SNOWFLAKE DATA :
{
“page_of_records”: [
{
“record”: {
“BRAND_NAME”: “BRAND”,
“PURCHASE_DATE”: “2022-06-05 17:26:09.000”,
“SKU”: “SKU123”,
“ASIN”: “ASIN123”,
“FULFILLMENT_CHANNEL”: “Amazon”,
“AMAZON_ORDER_ID”: “1234556789”,
“SALES_CHANNEL”: “Amazon.com”,
“MARKETPLACENAME”: “US”,
“QUANTITY”: 1,
“CURRENCY”: “USD”,
“ITEM_PRICE”: 37.99,
“GIFT_WRAP_PRICE”: 0,
“SHIPPING_PRICE”: 0,
“ITEM_PROMOTION_DISCOUNT”: 0,
“SHIP_STATE”: “NJ”,
“SHIP_COUNTRY”: “US”,
“SHIP_CITY”: “ENGLISHTOWN”,
“SHIP_POSTAL_CODE”: “07726-4258”,
“FIRST_SHIPMENT_DATE”: “2022-06-06”,
“CURRENCY_TO_USD_EXCHANGE_RATE”: 1,
“POSTEDDATE”: “2022-06-06”,
“POSTEDDATE_PT”: “2022-06-05”,
“POSTEDAMOUNT”: 37.99,
“TYPE”: “Principal”,
}
}
]
}
Data is retrieved in JSON format from Snowflake in Celigo
Creating a Snowflake connection in Celigo:
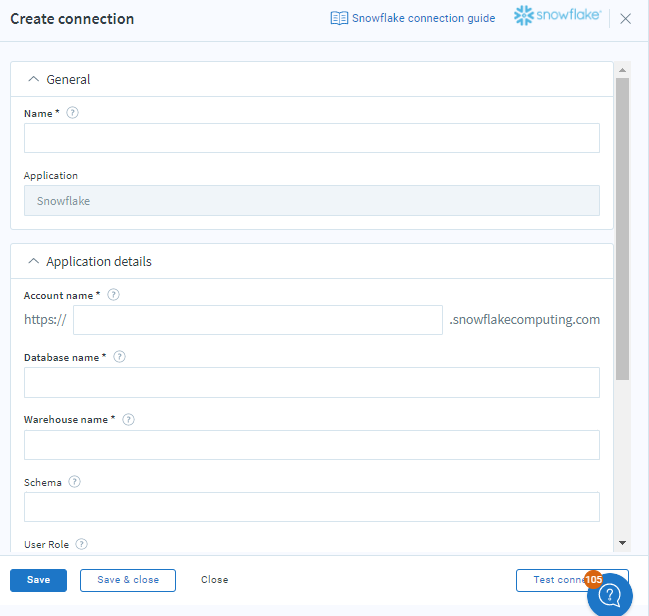
Name : Add a name to the connection
Account name : Account name of the Snowflake instance
Database name : Snowflake database that you want to connect to
Warehouse name : Warehouse used for executing the compute process
Schema: Name of the schema that the connection will use. If the name is not provided, the connection will use the default schema defined in Snowflake for the user.
Snowflake application as a source:
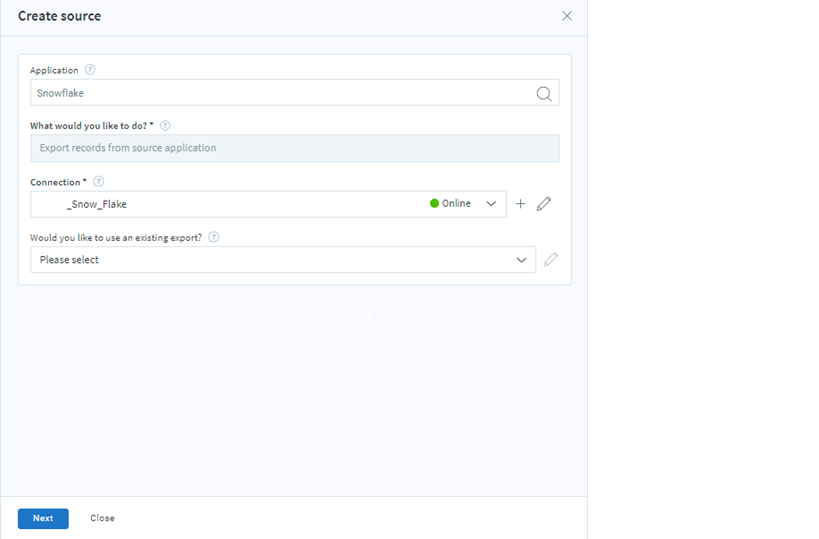
Select the existing export records or click next
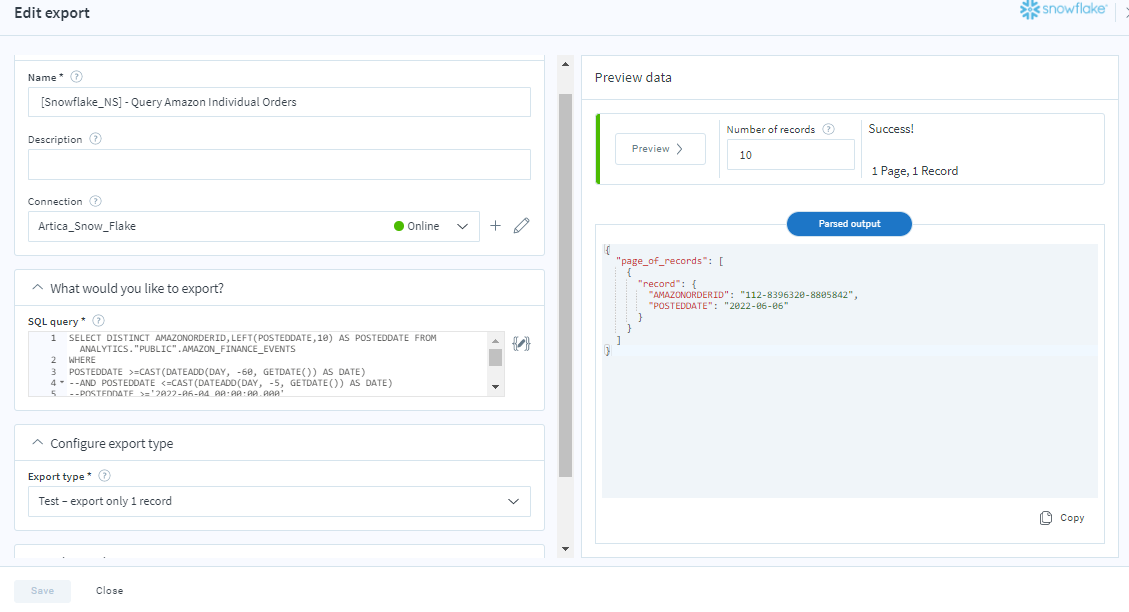
Name: Name your resource so that you can easily reference it from other parts of the application.
Description: Describe your resource as a summary for other users.
Connection: Define the specific connection you would like to use for your export or import. You can pre-establish and save your connections using Menu > Connections. Each stored connection contains credentials along with other related information needed to access the desired application. In addition, you can click the + icon beside this field to create a new connection.
SQL Query: Enter a SQL query that retrieves the records you want to export from your source database.
Export type: There are multiple export types available to help support common integration patterns. ‘All’ will export all data. ‘Delta’ will only export data that has changed since the last time the data flow was run. ‘Once’ will only export data that has not been exported already, and will also automatically update records to mark them as exported. ‘Test’ will only export one record by default, and should be used while testing to avoid having to sync large volumes of data.
ADVANCED Settings:
PAGESIZE: This can be added in advanced settings. It is used when an export runs in the context of a data flow (where the data from the export is sent right away to an import queue) integrator.io will break the data being exported into one or more smaller pages of records.
Data URL template: When a flow runs but has data errors, this field can be really helpful in that all the errors in the job dashboard are linked to the original data in the export application. This field uses a handlebar template to generate the dynamic links based on the data being exported. For example, if you are exporting a customer record from Shopify, you would most likely set this field to the following value ‘https://your-store.myshopify.com/admin/customers/{{{id}}}’. Or, if you are just exporting a CSV file from an FTP site then this field could simply be one or more columns from the file: {{{internal_id}}, {{{email}}}, and so on.
Override trace key template: Define a trace key that integrator.io will use to identify a unique record. You can use a single field such as {{{field1}}} or use a handlebar expression. For example, this syntax {{join “_” field1 field2}} will generate a trace key template field1_field2. When this field is set, you will override the platform default trace key field.
INVOKE: This resource can be invoked via an HTTP request to this unique URL.
Snowflake connection as lookup:

To add lookup select Lookup additional records (per record), select connection and existing lookup or click next to export new records from the application
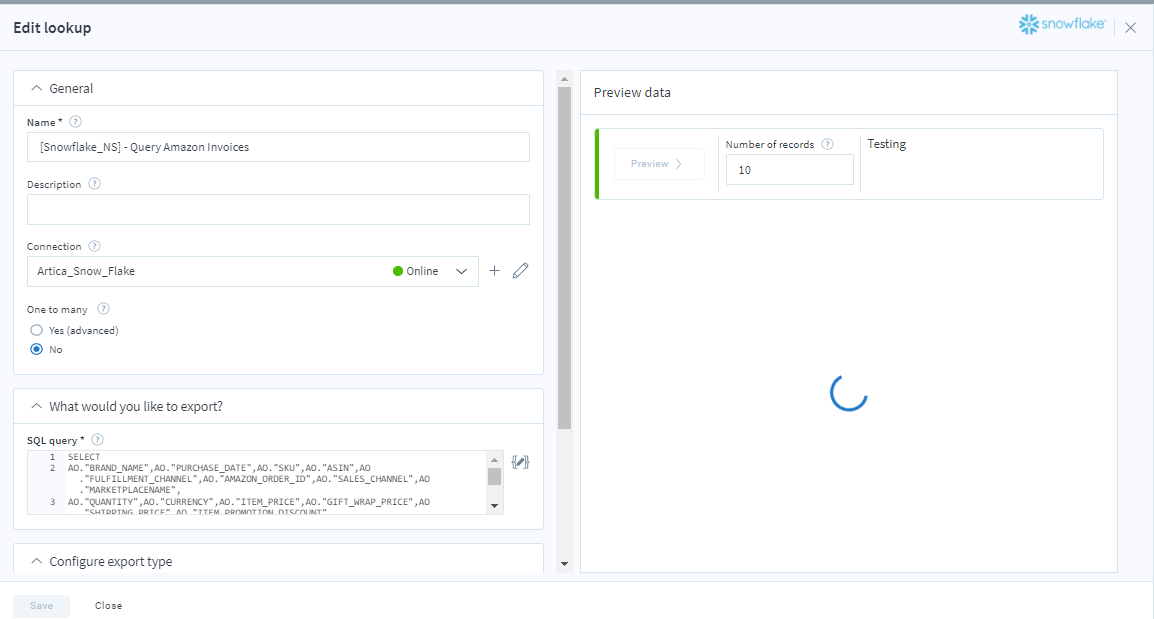
Name: Name your resource so that you can easily reference it from other parts of the application.
Description: Describe your resource as a summary for other users.
Connection: Define the specific connection you would like to use for your export or import. You can pre-establish and save your connections using Menu > Connections. Each stored connection contains credentials along with other related information needed to access the desired application. In addition, you can click the + icon beside this field to create a new connection
One to many: Choose this option if the records being processed contain child records that should instead be treated as the main record (i.e. for this step only in the flow). For example, you could be processing order records but want to process the line items within the orders as the main records for this step.
SQL Query: Enter a SQL query that retrieves the records you want to export from your source database.
Export type: There are multiple export types available to help support common integration patterns. ‘All’ will export all data. ‘Delta’ will only export data that has changed since the last time the data flow was run. ‘Once’ will only export data that has not been exported already, and will also automatically update records to mark them as exported. ‘Test’ will only export one record by default, and should be used while testing to avoid syncing lots of data.
ADVANCED Settings:
PAGESIZE: This can be added in advanced settings. It is used when an export runs in the context of a data flow (where the data from the export is sent right away to an import queue) integrator.io will break the data being exported into one or more smaller pages of records.
Data URL template: When your flow runs but has data errors this field can be really helpful in that it allows you to make sure that all the errors in your job dashboard have a link to the original data in the export application. This field uses a handlebars template to generate the dynamic links based on the data being exported. For example, if you are exporting a customer record from Shopify, you would most likely set this field to the following value ‘https://your-store.myshopify.com/admin/customers/{{{id}}}’. Or, if you are just exporting a CSV file from an FTP site then this field could simply be one or more columns from the file: {{{internal_id}}, {{{email}}}, etc…
Override trace key template : Define a trace key that integrator.io will use to identify a unique record. You can use a single field such as {{{field1}}} or use a handlebar expression. For example, this syntax {{join “_” field1 field2}} will generate a trace key template field1_field2. When this field is set, you will override the platform default trace key field.
INVOKE: This resource can be invoked via an HTTP request to this unique URL.
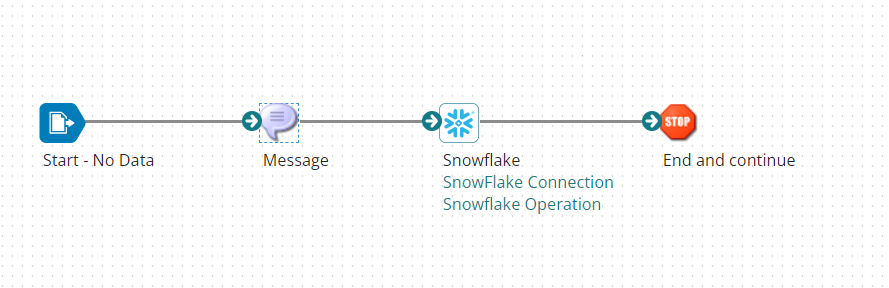
SAMPLE FLOW:
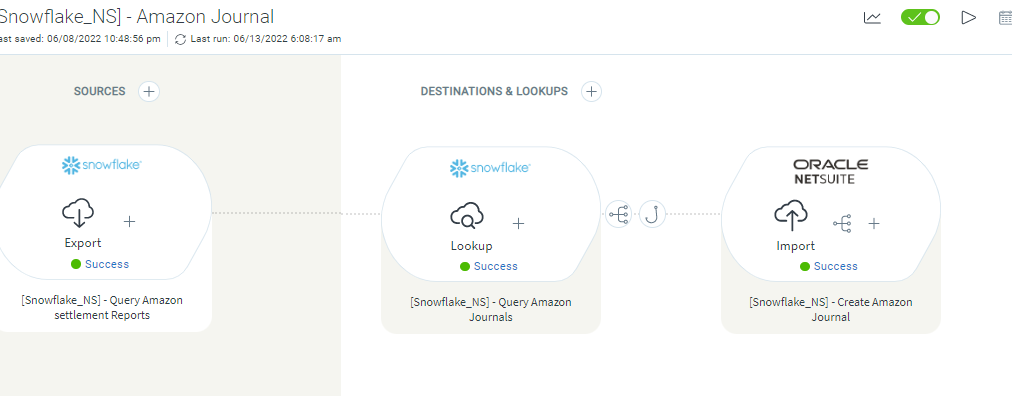
This is the sample flow used to create the journal in NetSuite using Snowflake as a source and Lookup to get the data.
Snowflake application as destination:

Select import records into destination application and select snowflake connection

Name: Name your resource so that you can easily reference it from other parts of the application.
Description: Describe your resource as a summary for other users.
Connection: The specific connection you would like to use for your export or import. You can pre-establish and save your connections using Menu > Connections. Each stored connection contains credentials along with other related information needed to access the desired application. In addition, you can click the + icon beside this field to create a new connection.
One to many: There are advanced use cases where a parent record is being passed around in a flow, but you actually need to process child records contained within the parent record context.
Choose type: ‘Use bulk insert SQL query’ to quickly insert batches of data efficiently.
‘Use SQL query once per record’ to execute a custom query per record.
‘Use SQL query once per page of records’ to execute a custom query per page of records.
‘Use SQL query on first page only’ to execute a custom query that runs only once in a flow on the first page of records.
Establishing Snowflake connection in Boomi:
Snowflake Connection :
The Snowflake connection contains the connection settings for the database; including the database name, username, password and other advanced settings. Optionally you can also configure Key Pair Authentication to utilize a more secure authentication method.

- Connection URL*: Enter the connection string required to establish a connection to the Snowflake instance. ACCOUNTNAME in the URL is present in Snowflake platform.
- User Name*: Enter your user name to authenticate with Snowflake.
- Password*: Enter the password to authenticate with Snowflake.
- Private Key String (optional): Enter the Private Key to authenticate with Snowflake.
- Passphrase (optional): Enter the password to authenticate with Snowflake.
- Warehouse Name (optional): Enter the name of your Warehouse.
- Database Name (optional): Enter the name of your Database.
- Schema Name (optional): Enter the name of your Schema.
- Role (optional): Enter role.
- S3 Access Key ID (optional): Enter the access key if you want to use Amazon S3 for staging.
- S3 Secret Key (optional): Enter the password if you want to use Amazon S3 for staging.
- Date Time Format (optional): Choose the desired Date Time format.
- Date Format (optional): Choose the desired Date format.
- Time Format (optional): Choose the desired Time format.
Notes:
- Connection URL, Username and Password are mandatory.
- When using the Private Key String and Passphrase authentication method, you no longer need to specify the Password.
- Warehouse Name, Database Name, Schema Name and Role are not mandatory and are used for filtering tables, views and stored procedures. Unless written between double quotation marks, they are case insensitive.
- When using Amazon S3 for staging, S3 Access Key ID and S3 Secret Key are mandatory.
- Date Time Format, Date Format and Time Format are available in several different formats and they determine the format of the retrieved and sent dates and times. The connector applies Date / Time formats when it is writing Boomi date/time values into Snowflake. Conversely, it applies these formats when it is reading date/time values from Snowflake into Boomi variables.
Snowflake Operation:
The Snowflake operation defines how to interact with the Snowflake instance, including transactions, batching, custom properties, etc.
The Snowflake connector supports Operations like Create, Update, Get, Query, Delete, Execute, SnowSQL, Bulk Load, Bulk Unload, Bulk Get, Bulk Put, Copy into Location, Copy into Table.
SnowSQL:
SnowSQL is an action that supports executing SQL commands. You need to enter the desired command either in the SQL Script field or in the SQL Script Document Property.
If the script contains defined parameters (using $ sign), you must configure them in a message. First you define a parameter in the script using the dollar-sign.
Example: “any string……$(Parameter Name) …. any string”
Then you should pass a JSON object to the connector that contains the value of the key i.e. $Parameter Name
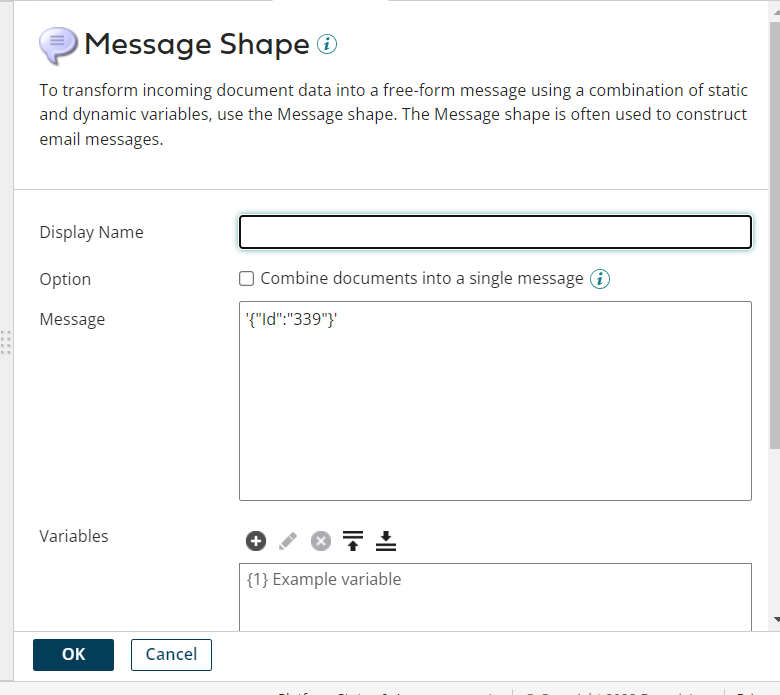
Optionally, you can use the Import button to generate a dummy profile that helps constructing a request profile based on the SQL script.
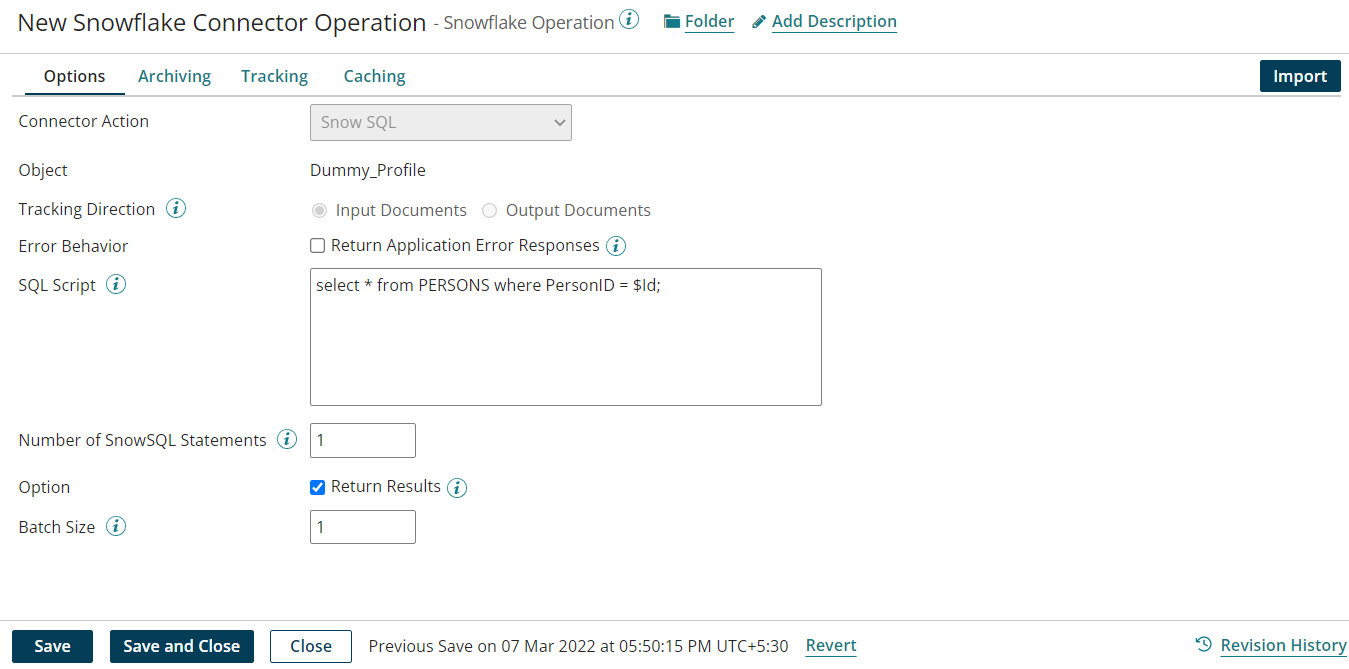
Document properties can be used to pass parameters in the message shape and Return Results should be checked in order to see the results for data retrieving commands
Bulk Load:
This action is used to insert new data from files on your local disk or Amazon S3 bucket into the Snowflake. Check the option Truncate before loading if you want to empty the Snowflake table before loading data into it.
Bulk Unload:
Bulk Unload is an action that retrieves data from a database table or view as CSV/JSON files to Boomi.
Bulk Get:
Bulk Get action is executed after using Copy into Location to unload data from table into snowflake stage. Then the file(s) are downloaded from snowflake internal stage to a local disk directory using Get command.
Bulk Put:
Bulk Put action is used to upload files from local disk to Snowflake internal storage using Put command, which has the ability to upload files concurrently. After uploading files to the internal stage, Copy Into Table operation can be executed to move data from Snowflake internal stage to a Snowflake table.
Copy into Location:
Copy Into Location is an action that executes Copy Into command which moves data from a selected table to any stage or external location using either predefined file format or specified file format.
Copy into Table:
Copy Into Table is an action that executes Copy Into command which moves files from stage or external location to a Snowflake table using predefined file format or specified file format.
Here is the sample flow to send data into Snowflake: